Install and configure the EpicAuth Plugin
The following are the directions for installing and configuring the EpicAuth plugin on the host system where Hyperive is installed and the Windows endpoint device where the XA Client is installed.
Directions for workflow-specific configurations (not commonly used):
Hyperdrive Host System Install
Follow these steps to install the Identity Automation EpicAuth Plugin on a system where Hyperdrive is installed.
Citrix server
Azure Virtual Desktop Virtual Machine
Local Workstation
⚙️ Automated Deployment ConsiderationsPlease refer to this article for automated deployment considerations.
Run the EpicAuth plugin installation file.
Run Identity Automation ProxCard Epic Login Device.msi (available from Healthcast Product Downloads page.
You may need to consider using the following MSI properties when installing:
Optional Use Remote Setting:
Set TFA_USEREMOTE to True if the XA client is installed on the server or AVD VM and you want to get data from the endpoint XA client.
Optional VerticalOffsetForLoginScreen:
Set TFA_VERTICAL_OFFSET_FOR_LOGIN_SCREEN to adjust the authentication window placement.
Optional Logoff Cleanup Settings:
To configure Logoff Cleanup from the Published Hyperspace session, perform the following configurations:
To use Logoff Cleanup, the settings in the xaLogoffCleanup.xml file in the plugin install folder on the Citrix server must be updated.
In addition, there are three settings to consider configuring on the Citrix Server:
Use this setting to set Logoff Cleanup to be called on XA lock, and if "DisableOnBeforeLock" is set to “True,” Using these two settings will allow Logoff Cleanup to be called without securing or logging off Hyperspace.
Use this setting to set Logoff Cleanup to be called on Hyperspace secure.
Use this setting to set Logoff Cleanup to be called on Hyperspace logoff.
📒 If this is a local workstation installation, you must also configure endpoint settings, like auto launch and workflow.
Import the client registration certificate.
Import the “.PFX file”, generated in the Create Client Registration Keys section, to the Local Machine certificate store.
Test systems, use the non-prod “.PFX” file
Production systems, use the prod “.PFX” file
Import the “.PFX” file into the Local Machine\Personal\Certificates store.
While importing, ensure the private key is NOT marked as exportable in the import options.
📒 The Register Client tool has two sections:
One for using the Hyperdrive Launcher for registration and one for using Interconnect for registration. You only need to interact with the appropriate section for your environment.
Register the client
As a local administrator, run the IA.EpicAuth.RegisterClient.exe tool in the installation folder. This will load the Client Registration tool.
If you are going to be using the Hyperdrive Launcher for registration:
Enter Organization Id
Organization Id can be determined based on the Epic config file name found in the Hyperdrive Config folder (default folder is C:\Program Files (x86)\Epic\Hyperdrive\Config).
For example, if the file name is 100Config.json, then your Organization Id is 100
Enter Environment
The Environment setting can be found in the above-referenced config file.
In the example below (from a configuration .json file), the Environment name is "Testing"
"Environments": {
"Testing": {
 "DisplayName": "Current Testing",
 "HSWebServerURL": "https://fhir.epic.com/HSWeb_uscdi"
}
Click the Register Client button.
This will start Hyperdrive/Hyperspace, which will be used to complete the registration process.
Hyperspace will run for approximately 30 seconds.
If successful, a message will appear that shows Registration Succeeded.
If client registration does not succeed, see Client Registration Troubleshooting.
Close the message box.
Close the RegisterClient tool.
Close Hyperspace.
Click through any additional prompts to complete the installation.
If you will be using Interconnect for registration, you only need to interact with the items underneath the Use Interconnect section of the Register Client tool interface.
Enter the appropriate Interconnect URL for the environment you are registering against.
2. If you do not know your Interconnect URL, please contact your Epic TS.Verify the environment you are going to be registering against.
If you are registering a test environment, leave the Production checkbox unchecked:
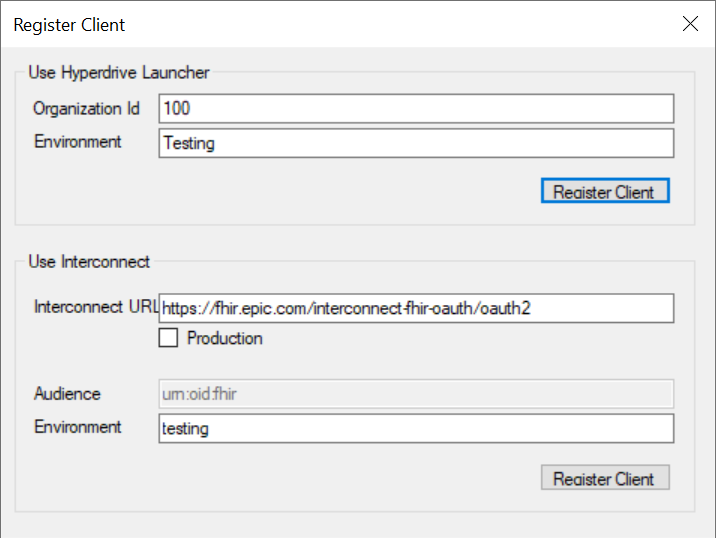
Enter the Environment setting that is appropriate for the environment you are trying to register against.
If you are registering a production environment, make sure to check the Production checkbox:
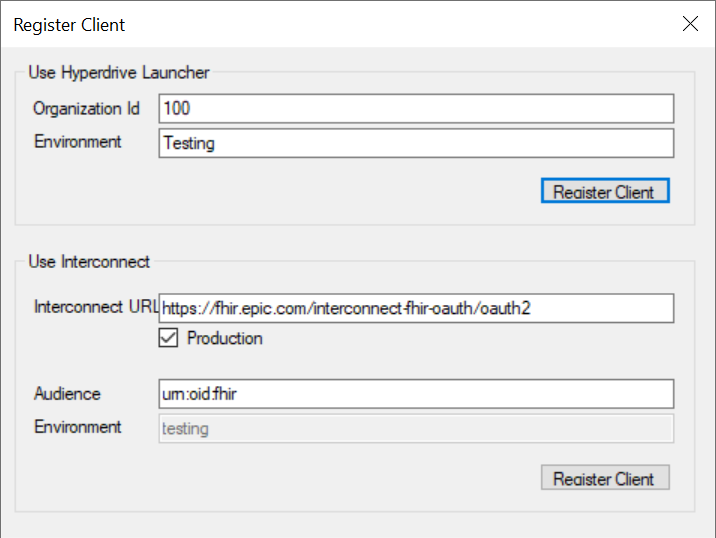
Enter the Audience setting that is appropriate for the environment you are trying to register against.
Windows Endpoint Install
The following are the directions for installing and configuring the Workflow and Auto-launch settings on a Windows endpoint device. These can be set on the command line using the MSI properties at installation or can be set in the Windows registry after installation.
Run the Identity Automation ProxCard Epic Login Device.msi (available from Healthcast Product Downloads page) using the selected MSI properties in the Workflow Configurations and Auto-Launch Configurations sections.
Install any dependent client software like Citrix Client or Microsoft Remote Desktop Client.
📒 To find specific registry settings use the MSI property name to lookup in the MSI Properties and Registry Settings page.
Workflow Configurations
The following MSI properties can be added to any auto-launch configuration to change how Hyperspace and the ExactACCESS client interact.
Set to “True” to secure Hyperspace when a user logs off or locks the XA client.
(Default) Set it to “False” to log off Hyperspace when a user logs off or locks the XA client.
TFA_LOGOFF_XA_ON_EPIC_SECURE_LOGOUT
Set to “True” to lock or log off the XA client when a user secures or logs off Hyperspace.
(Default) Set to “False” to have the XA client ignore it when a user secures or logs off Hyperspace.
Set it to “True” to not secure or log out of Hyperspace when the XA client is locked.
(Default) Set it to “False” to secure or log out of Hyperspace when the XA client is locked.
TFA_ENABLE_ONBEFORELOCKTIMEOUT
Set it to “True” to not secure or log out of Hyperspace when an XA client inactivity timeout triggers an XA client lock.
(Default) Set it to “False” to secure or log out of Hyperspace when the XA client is locked.
📒 Setting TFA_HYPERSPACE_SECURE to True is typically done for exam room workflows where Hyperspace needs to be secured between users.
Auto-Launch Configurations
The following MSI properties are the configuration options to automatically launch Hyperdrive when a user logs into the XA client or when the desktop is started.
Hyperdrive Launched Locally
MSI Command Line Properties with Example Values:
TFA_HYPERSPACE_PATH="C:\Program Files (x86)\Epic\Hyperdrive\VersionIndependent\Launcher.exe"
TFA_HYPERSPACE_PARAMS="id=100 env=Testing"
TFA_HYPERSPACE_WINDOW_CLASS="Chrome_"
⚙️ Example Install Command Line%systemroot%\system32\msiexec /i "HealthCast ProxCard Epic Login Device.msi" TFA_LAUNCHTYPE=1 TFA_HYPERSPACE_PATH="C:\Program Files (x86)\Epic\Hyperdrive\VersionIndependent\Launcher.exe" TFA_HYPERSPACE_PARAMS="id=100 env=Testing" TFA_HYPERSPACE_WINDOW_CLASS="Chrome_"
Hyperdrive Launched via Citrix using pubLauncherSF.exe
📒 pubLauncherSF.exe starts Hyperdrive published from a Citrix server using Citrix Storefront API.
MSI Command Line Properties with Example Values:
TFA_SF_URL=”http://csts-ssotest.example.com/Citrix/StoreWeb/”
TFA_SF_RESOURCE_NAME="Hyperspace"
TFA_HYPERSPACE_WINDOW_TITLE="Hyperspace"
⚙️ Example Install Command Line%systemroot%\system32\msiexec /i "HealthCast ProxCard Epic Login Device.msi" TFA_LAUNCHTYPE=4 TFA_SF_URL="http://csts-ssotest.example.com/Citrix/StoreWeb/" TFA_SF_RESOURCE_NAME="ce"Hyperspa TFA_SF_AUTHTYPE=1 TFA_HYPERSPACE_WINDOW_TITLE="Hyperspace"
🛡️ IMPORTANT!
Citrix Workspace or Reciever Client must be installed and configured on the Endpoint device.
HTTP Basic authentication must be enabled on your Storefront server.
The HTTP basic authentication exposes a simple, Internet-standard-defined mechanism for clients, plug-ins, and third-party applications to inject user credentials.
Additional pubLaucherSF.exe information: Citrix Connectivity.
Hyperdrive Launched via Citrix using Slingshot
📒 Slingshot is an Epic application used to launch Hyperdrive in Citrix
MSI Command Line Properties with Example Values:
TFA_HYPERSPACE_PATH= "C:\Program Files (x86)\Epic\Hyperdrive\VersionIndependent\Launcher.exe"
TFA_HYPERSPACE_PARAMS="id=665 env=slingshot"
TFA_HYPERSPACE_WINDOW_CLASS="Chrome_"
📒 How to find TFA_HYPERSPACE_PARAMS setting:
This setting needs to include an ID of 665 (specific ID indicating Slingshot), and the environment setting.
The environment setting can be found in “C:\Program Files (x86)\Epic\Hyperdrive\Config\SlingshotConfig.json” config file.
The following screenshot the environment settings is highlighted in red:
.png "image(461).png")
⚙️ Example: Install Command Line%systemroot%\system32\msiexec /i "HealthCast ProxCard Epic Login Device.msi" TFA_LAUNCHTYPE=1 TFA_HYPERSPACE_PATH="C:\Program Files (x86)\Epic\Hyperdrive\VersionIndependent\Launcher.exe" TFA_HYPERSPACE_PARAMS="id=665 env=slingshot" TFA_HYPERSPACE_WINDOW_CLASS="Chrome_"
Hyperdrive Launched via Azure Virtual Desktop using AVD Remote App Launcher
📒 Technical Note: IA.XA.RDS.RemoteAppLauncher.exe starts Hyperdrive published as a Remote App from an Azure Virtual Desktop configuration.
MSI Command Line Properties with Example Values:
⚙️ Example: Install Command Line%systemroot%\system32\msiexec /i "HealthCast ProxCard Epic Login Device.msi" TFA_LAUNCHTYPE=5 TFA_AVD_APPNAME="Hyperspace" TFA_AVD_USERNAME="user@mydomain.onmicrosoft.com"
🛡️ IMPORTANT!Microsoft Remote Desktop Version 1.2.5709 or newer needs to be installed; download it here.
This configuration requires that Hyperdrive is published as a RemoteApp from Azure Virtual Desktop.
📒 While configuring Hyperdrive as a RemoteApp published from Azure Virtual Desktop is beyond the scope of this documentation, you may find the following resources helpful to get started:
⚙️ To find the value needed for the TFA_AVD_APPNAME parameter, use the FindRDP.ps1 utility to locate the RDP file for the particular AVD remote application.
Hyperdrive Launched via Omnissa Horizon Client App Launcher
📒 Technical Note: IA.XA.RDS.HorizonAppLauncher.exe starts Hyperdrive published as a Remote App from an Omnissa Horizon Virtual Desktop Infrastructure (VDI) configuration. Hyperdrive is launched using the Omnissa Horizon URI scheme, which requires the Omnissa Horizon Client to be installed and configured on the endpoint.
MSI Command Line Properties with Example Values:
TFA_HORIZON_LAUNCHURL="vmware-view://horizon.company.com/Hyperdrive"
TFA_HORIZON_WINDOW_CLASS="HorizonUnityHostWndClass"
TFA_HORIZON_WINDOW_TITLE="Hyperspace"
⚙️ Example: Install Command Line%systemroot%\system32\msiexec /i "HealthCast ProxCard Epic Login Device.msi" TFA_LAUNCHTYPE=6 TFA_HORIZON_LAUNCHURL="vmware-view://horizon.company.com/Hyperdrive" TFA_HORIZON_WINDOW_CLASS="HorizonUnityHostWndClass" TFA_HORIZON_WINDOW_TITLE="Hyperspace"
Omnissa Horizon Client Configuration — Windows Authentication Passthrough
Before configuring the EpicAuth Plugin, the Omnissa Horizon Client must be configured to use Windows Authentication Passthrough ("Log in as current user") so that the currently logged-in Windows user's credentials are passed automatically to the Horizon Connection Server. This eliminates the separate Horizon login prompt when Hyperdrive launches.
Endpoint (client-side) configuration:
Open the Omnissa Horizon Client on the endpoint.
Click the Settings (gear) icon.
Under the General tab, enable Log in as current user.
Enable Include domain to ensure the Windows domain credential is included.
Server-side configuration (Horizon Connection Server):
Open the Horizon Administrator console.
Navigate to View Configuration > Servers > Connection Servers.
Select the Connection Server and click Edit.
On the Authentication tab, enable Allow pass-through authentication.
📒 Technical Note: For detailed steps and requirements, refer to the "Using the Log In as Current User Feature" section in the Omnissa Horizon Client for Windows documentation at docs.omnissa.com.
🛡️IMPORTANT!
The endpoint device must be domain-joined to a domain trusted by the Horizon environment.
Omnissa Horizon Client must be installed and configured on the endpoint device with Windows Authentication Passthrough enabled (see above).
Hyperdrive must be published as a Remote App from Omnissa Horizon.
Community Connect Configuration
The Community Connect configuration enables the Epic Auth plugin to retrieve Hyperspace credentials stored on the XA server instead of relying on the user’s domain credentials from their Windows or XA client login. This configuration is currently only supported for Citrix connections using Citrix Storefront.
Who Uses This Configuration?
The setup is designed for Epic Community Connect customers who do not have their Active Directory (AD) domains integrated with Epic Hyperspace. These customers access Hyperspace hosted through Citrix Storefront, requiring a login separate from their local Windows domain to access Citrix and Epic Hyperspace.
Requirements:
For this configuration to function, the organization hosting Epic Hyperspace must have the Epic Auth Plugin installed on the Citrix server where Hyperspace is deployed. No special server configuration is needed. When configured as a Community Connect endpoint, the client device will retrieve credentials from the XA server instead of passing through domain user credentials.
Configuration Steps:
XA Administrator Setup
Create Epic Application: In the XA Administrator, create a new application called “Epic.”
Assign User Groups: Drag the new “Epic” application to the organization frame and assign it to the user groups that require access.
Control ID: Copy the Control ID for the Epic application from its properties.
This Control ID is needed to configure the MSI property TFA_EPICUSERCIID during installation.
Install Epic Auth Plugin on the Endpoint Device using the following MSI properties:
MSI Command Line Properties with Example Values:
TFA_EPICUSERCIID={D38B50AC-F365-4616-A77A-0B12720BB41B}
TFA_SF_DOMAIN=mydomain
⚙️ Example: Install Command Line
%systemroot%\system32\msiexec /i "HealthCast ProxCard Epic Login Device.msi" TFA_EPICUSERCIID={D38B50AC-F365-4616-A77A-0B12720BB41B} TFA_SF_DOMAIN=mydomain TFA_LAUNCHTYPE=4 TFA_SF_URL=http://mydomain.com/Citrix/StoreWeb/ TFA_SF_RESOURCE_NAME="Hyperspace" TFA_SF_AUTHTYPE=1 TFA_HYPERSPACE_WINDOW_TITLE="Hyperspace"
📒 After configuring Community Connect, the login workflow changes slightly compared to the typical configuration:
When users start pubLauncherSF.exe the first time, they will be prompted to provide their Hyperspace username and password.
Once entered, the credentials are stored and will not prompt again unless the login fails.
If Hyperspace is already open, the system may prompt for the username and password again. Sometimes, this prompt might get lost if the user clicks on the Hyperspace window before entering their credentials.
Standalone Badge Scanning Configuration for Epic Narrator
The following are the directions for configuring the XA client and the Epic Auth Plugin to support Epic's standalone badge workflow for Narrator. The Standalone badge configuration is an Epic Hyperspace configuration on a dedicated workstation that allows clinicians attending critical events (e.g., trauma situations) to use badge scanning to quickly record arrival and departure times to the event.
Hyperspace Configuration
The Identity Automation ProgID that is used in the Standalone configuration is the IA.Hyperdrive.ProxCard ProgID.
The passive ProgID (IA.Hyperdrive.ProxCardPassive) will not be used - it is only used in the Integrated Narrator workflow. See this article.
Authentication Administration
Context 61 would need to be configured with an E0G record that has the IA.Hyperdrive.ProxCard ProgID.
This context will instruct our device to go into intercept mode, which means badge tap will never make it to XA
XA does need to be installed, but the user context will not be captured within XA
eXactACCESS Client Configuration
Install the XA Client in Non-locking Kiosk Mode.
You can turn it off if not in non-locking, setting the KMSupportsLock registry to zero.
[HKEY_LOCAL_MACHINE\SOFTWARE\HealthCast\eXactACCESS]
"KMSupportsLock"=dword:00000000
After installation, remove the following registry settings.
📒 These settings start up the XA Client. Staring the XA Client is unnecessary because of the Epic Standalone Badge configuration will directly interact with the badge scanning service when it recognizes that the login device is set to context 61 in Epic.[HKEY_LOCAL_MACHINE\SOFTWARE\Microsoft\Windows\CurrentVersion\Run] "xahid_kiosk.exe"="C:\\Program Files (x86)\\HealthCast\\eXactACCESS\\xahid_kiosk.exe" "hciNetStatus.exe"="\"C:\\Program Files (x86)\\HealthCast\\eXactACCESS\\hciNetStatus.exe\" hcikmlock" "watchforlogoff.exe"="C:\\Program Files (x86)\\HealthCast\\eXactACCESS\\watchforlogoff.exe" "usernotification.exe"="C:\\Program Files (x86)\\HealthCast\\eXactACCESS\\usernotification.exe"After installation of the XA client, you will need to configure an alternate method to start Hyperspace, like using Epic’s Slingshot application.
Passive Authentication Device to Support Narrator Workflow
Epic's Passive Mode functionality allows an authentication device implementation to return a user who taps their proximity card to arrive for events in Narrator. Any users with their proximity card enrolled can tap their proximity card to arrive for the Narrator event. When the Narrator workflow is closed, Hyperspace will return to its normal proximity card authentication workflow.
Setting Up Passive Authentication Device in Hyperspace for Narrator Support
To support the embedded Narrator's automatic arrival functionality, you must configure the HCILoginDeviceNET.ProxCardPassive program ID in the Epic back-end system. This must be configured in the correct authentication context for Narrator in Hyperspace Authentication Administration.
To set up the Passive Authentication Device, follow the instructions in Configuring Identity Automation Authentication Devices in Epic Hyperspace, followed by the instructions with HCILoginDeviceNET.ProxCardPassive device, see Create a Device (E0G) Record in Epic.
🛡️ IMPORTANT!Epic's Default Login (O) device should be added to the Primary Device setting after the HClLoginDeviceNET.ProCard device.
📒 HICLoginDeviceNET.ProxCardPassive is only supported in the Narrator workflow. Use Epic's documentation for the context this should be configured. In addition this devices requires that the HClLoginDeviceNET.ProxCard device has been configured for primary authentication.
Troubleshooting
Client Registration Troubleshooting
If the client registration process fails, here are common areas to check for issues:
Certificates
Client Prerequisites