
Kiosk Mode - Passthrough
The XA Passthrough Authentication workflow configuration allows users to configure their environment for quick and direct access to an RDP terminal server session, a Citrix ICA session, a Citrix Storefront session, or a VMware Horizon View session.
The operation of this configuration can also be enhanced with the addition of the ExactAccess shell replacement option. When the shell replacement software is paired with domain policies to secure the Windows desktop, users are not able to interact with the local file system or Windows desktop for added security. This feature is automatically disabled for Administrative users to perform maintenance on the workstation.
The XA Passthrough Authentication configuration requires only the HealthCast Prox/Auth server to reduce server requirements; the full XA server software suite is supported, but not required.
Interactive Installation
-
Run the MSI
-
Adjust install directory if desired
-
Click Install
-
Confirm UAC if prompted
-
Client Configuration Tool will start when the install is complete
-
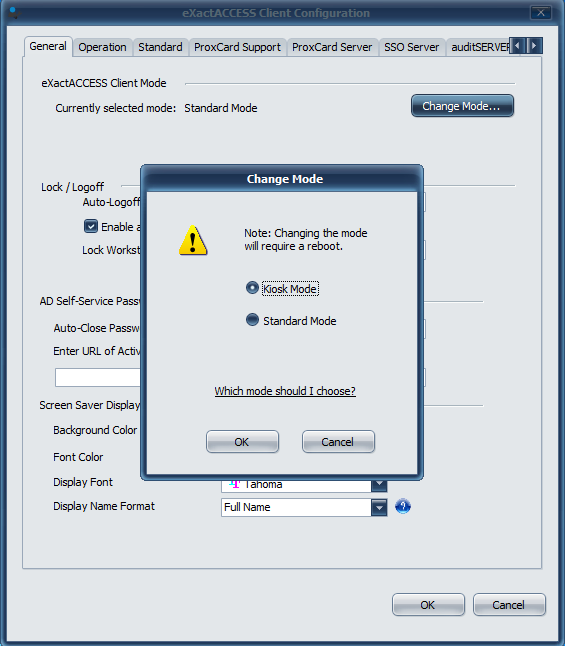
Select Change Mode button
-
Choose Kiosk Mode
-
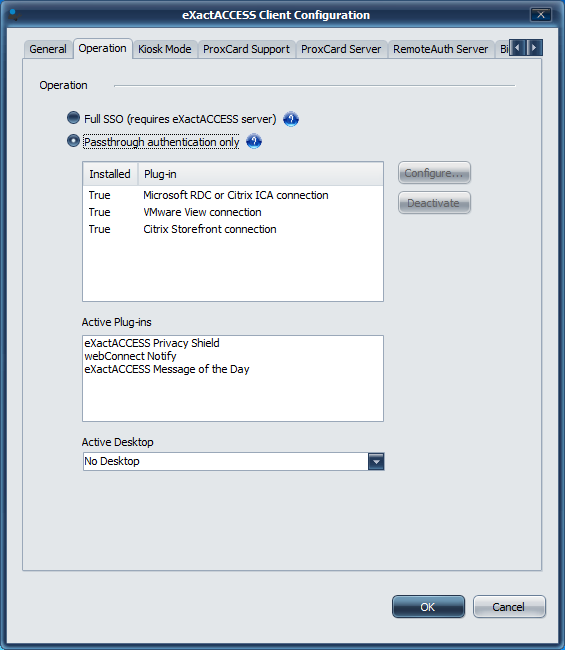
Select Operation Tab
-
Choose Passthrough
-
Follow the instructions outlined below for the appropriate connection type
The instructions below indicate to log in as an administrator and run the Client Configuration Tool. During installation, this tool is started for you automatically and is running as an administrator. Those steps can be skipped during this process. Start with step 3 for the desired configuration.
- After UI configuration is complete, select Finish and reboot the workstation when prompted.
Remote Desktop Protocol (RDP)
Remote Desktop Protocol (RDP) 7 and 8 are supported.
If you are using RDP to connect to a Citrix Desktop, it is necessary to prevent RDP Locked Sessions on the Citrix Server. See Citrix KB Article CTX138189for information on how to configure this setting.
- Log-in as a Local Administrator to the workstation you would like to make changes on. The Client Configuration Tool will only run under an account with Local Administrator privileges.
- Navigate to the Windows® Start menu> All Programs > HealthCast > ExactAccess > Utilities > Configuration > Client Configuration.
- Click the Operation tab to show the type of configuration
- Select the "Passthrough authentication only" option.
- Select the item "Microsoft RDC or Citrix ICA connection" and click the "Configure..." button.
- From this menu option, select the Microsoft RDC button to configure and activate support for RDC connectivity.
- Enter the information appropriate for your environment in the configuration settings page for RDC.
Command line deployment
EXAMPLE
msiexec /i "HealthCast ExactAccess Client.msi" XA_MODE=KM XA_PROX_AUTH=myProxAuthServer XAD_ENABLED=1 X_PLUGIN=RDC X_RDC_TS=myTSserver:port# X_KM_DOMAIN=HEALTHCAST X_PSE=0 X_PIN_LEN=5 X_RUN_CONFIG=0 /qn
Citrix ICA
Citrix Receiver 4.3-4.7 are supported
The embedded ICA connection does not support connections to XenDesktop remote sessions. It will connect to published desktops made available through Citrix XenApp.
To connect to XenDesktop remote sessions, use the Citrix Storefront option.
- Log-in as a Local Administrator to the workstation you would like to make changes on. The Client Configuration Tool will only run under an account with Local Administrator privileges.
- Navigate to the Windows® Start menu> All Programs > HealthCast > ExactAccess > Utilities > Configuration > Client Configuration.
- Click the Operation tab to show the type of configuration
- Select the "Passthrough authentication only" option.
- Select the item "Microsoft RDC or Citrix ICA connection" and click the "Configure..." button.
- From this menu option, select the Citrix ICA button to configure and activate support for ICA connectivity.
- Enter the information appropriate for your environment in the configuration settings page for ICA.
If you have changed the XML broker port for your Citrix servers, on the Server Name field, enter the server name colon (:) port together. If you are using the default port for the XML broker, the port specification can be omitted.
example: server:port
Command line deployment
msiexec /i "HealthCast ExactAccess Client.msi" XA_MODE=KM XA_PROX_AUTH=myProxAuthServer XAD_ENABLED=1 X_PLUGIN=ICA X_CS1=myCitrixserver:8080 X_KM_DOMAIN=HEALTHCAST X_PSE=0 X_PIN_LEN=5 X_RUN_CONFIG=0 /qn
Citrix Storefront
HTTP Basic authentication must be enabled on the StoreFront servers
Citrix Receiver client versions supported: 4.2 - 4.9
- Log-in as a Local Administrator to the workstation you would like to make changes on. The Client Configuration Tool will only run under an account with Local Administrator privileges.
- Navigate to the Windows® Start menu> All Programs > HealthCast > ExactAccess > Utilities > Configuration > Client Configuration.
- Click the Operation tab to show the type of configuration
- Select the "Passthrough authentication only" option.
- Select the item "Citrix Storefront connection" and click the "Configure..." button.
- Enter the information appropriate for your environment in the configuration settings page for StoreFront.
Published Name - This is the name of the resource to be launched. The same name that is displayed on the StoreFront web page.
Window Title - This is the text that appears in the title bar of the published resource. Typically the published name a space and a "-" is sufficient.
Storefront URL - This is the Receiver for Web Sites URL found in Citrix Studio > Citrix Storefront > Stores. The correct URL – when placed in a browser should resolve to the Citrix StoreFront login page.
Authentication Type – Determine what credentials to use when authenticating to StoreFront. Select XA User to use the XA Users credentials, select Windows User to use the Windows user credentials.
Application Type - If the published resource is a Shared desktop or VDI select the Shared desktop or VDI radio button if the published resource is an application i.e. Microsoft Notepad or Calculator, select the Published application radio button.If the Shared desktop or VDI radio button is selected the Set to Full Screen checkbox is enabled. If checked the Shared desktop or VDI will be displayed in full screen and the Citrix Tool bar is hidden limiting the user to the VDI or Shared Desktop.
Logging– If checked pubLauncherSF will log to %AppData%\HealthCast\logs\pubLauncherSF.log.
When enabled the application will log to the C:\Users<username>\AppData\Roaming\HealthCast\logs\sfConnect.log file.
TraceLevel – Set Trace level 1 – 4 for logging. The higher the trace level the more detailed logging.
1 – minimal
2 – low
3 – medium
4 – verbose
VMware Horizon View
VMware Horizon client versions supported: 4.0 - 4.6.1
- Log-in as a Local Administrator to the workstation you would like to make changes on.
- The Client Configuration Tool will only run under an account with Local Administrator privileges.
- Navigate to the Windows® Start menu> All Programs > HealthCast > ExactAccess > Utilities > Configuration > Client Configuration.
- Click the Operation tab to show the type of configuration
- Select the "Passthrough authentication only" option.
- Select the item "VMware Horizon View connection" and click the "Configure..." button.
- Enter the information appropriate for your environment in the configuration settings page for Horizon View.
Command line deployment
EXAMPLE
msiexec /i "HealthCast ExactAccess Client.msi" XA_MODE=KM XA_PROX_AUTH=myProxAuthServer XAD_ENABLED=1 X_PLUGIN=VIEW X_VW_DT=myDeskPool X_VW_URL=myViewURL X_KM_DOMAIN=HEALTHCAST X_PSE=0 X_PIN_LEN=5 X_RUN_CONFIG=0 /qn
Command Line Installation
See Configuring KM Passthrough Connectivity for details.
Configuring KM Passthrough Connectivity
Installation command line parameters for Kiosk Mode with passthrough configuration
From an administrative command prompt (or remote deployment package), execute the ExactAccess client install with the appropriate command line parameters. Below are the minimum values that need to be configured.
- Set kiosk mode: XA_MODE=KM
- Set the servers: XA_PROX_AUTH=(name of server)
- Set to use no SSO: XAD_ENABLED=1
- Select the appropriate plug-in connector
- X_PLUGIN=RDC
- Set the RDC server to connect to: X_RDC_TS=(Remote Desktop server name:[optional port number])
- example: X_RDC_TS=myRDServer:443
- X_PLUGIN=ICA
- Set the Citrix server to connect to: X_CS1=(server name:port)
- example: X_CS1=myCTXServer:80
- Additional X_CS2 and X_CS3 may be specified for additional fail over servers.
- X_PLUGIN=VIEW
- Set the Desktop Pool: X_VW_DT=(pool name)
- Set the Server URL: X_VW_URL=(server URL)
- X_PLUGIN=SF
- Set the resource name as published for Storefront : X_SF_RN=(resource name)
- Set the app title: X_SF_AT=(application title)
- Set the Storefront URL: X_SF_URL=(storefront URL)
- X_PLUGIN=RDC
- Set the Kiosk Domain to validate users against: X_KM_DOMAIN=(Default Domain)
- Enable PIN Support: X_PSE=0 (by default, PIN support is DISABLED)
- -1 = Pin support DISABLED (value as: X_PSE=4294967295)
- 0 = Always prompt for PIN on every login (may also prompt for password if it is expired)
- Set PIN Minimum Length: X_PIN_LEN=(4, 5, or 6)
- (optional) Enable ExactAccess Shell replacement: X_EASE=1
See the Shell replacement page for additional required setup on Windows 10 workstations.
- (optional) Disable remote auth for domain joined workstations if desired: X_RARL=0
- Disable running configuration tool after install/upgrade: X_RUN_CONFIG=0
If you are configuring your workstations against a full installation of ExactAccess server, the additional server values may be specified for complete operation:
Set the server for HCIDeploy: X_D_SRV=(name of server)
Set the server for audit: X_AUDIT_SRV=(name of server)
Configuring Connectivity Plug-ins with the Client Configuration Tool
Remote Desktop Protocol (RDP)
Remote Desktop Protocol (RDP) 7 and 8 are supported.
If you are using RDP to connect to a Citrix Desktop, it is necessary to prevent RDP Locked Sessions on the Citrix Server. See Citrix KB Article CTX138189for information on how to configure this setting.
- Log-in as a Local Administrator to the workstation you would like to make changes on. The Client Configuration Tool will only run under an account with Local Administrator privileges.
- Navigate to the Windows® Start menu> All Programs > HealthCast > ExactAccess > Utilities > Configuration > Client Configuration.
- Click the Operation tab to show the type of configuration
- Select the "Passthrough authentication only" option.
- Select the item "Microsoft RDC or Citrix ICA connection" and click the "Configure..." button.
- From this menu option, select the Microsoft RDC button to configure and activate support for RDC connectivity.
- Enter the information appropriate for your environment in the configuration settings page for RDC.
Command line deployment
EXAMPLE
msiexec /i "HealthCast ExactAccess Client.msi" XA_MODE=KM XA_PROX_AUTH=myProxAuthServer XAD_ENABLED=1 X_PLUGIN=RDC X_RDC_TS=myTSserver:port# X_KM_DOMAIN=HEALTHCAST X_PSE=0 X_PIN_LEN=5 X_RUN_CONFIG=0 /qn
Citrix ICA
Citrix Receiver 4.3-4.7 are supported
The embedded ICA connection does not support connections to XenDesktop remote sessions. It will connect to published desktops made available through Citrix XenApp.
To connect to XenDesktop remote sessions, use the Citrix Storefront option.
- Log-in as a Local Administrator to the workstation you would like to make changes on. The Client Configuration Tool will only run under an account with Local Administrator privileges.
- Navigate to the Windows® Start menu> All Programs > HealthCast > ExactAccess > Utilities > Configuration > Client Configuration.
- Click the Operation tab to show the type of configuration
- Select the "Passthrough authentication only" option.
- Select the item "Microsoft RDC or Citrix ICA connection" and click the "Configure..." button.
- From this menu option, select the Citrix ICA button to configure and activate support for ICA connectivity.
- Enter the information appropriate for your environment in the configuration settings page for ICA.
If you have change the XML broker port for your Citrix servers, on the Server Name field, enter the server name colon (:) port together. If you are using the default port for the XML broker, the port specification can be omitted.
example: server:port
Command Line Deployment
EXAMPLE
msiexec /i "HealthCast ExactAccess Client.msi" XA_MODE=KM XA_PROX_AUTH=myProxAuthServer XAD_ENABLED=1 X_PLUGIN=ICA X_CS1=myCitrixserver:8080 X_KM_DOMAIN=HEALTHCAST X_PSE=0 X_PIN_LEN=5 X_RUN_CONFIG=0 /qn
Citrix Storefront
HTTP Basic authentication must be enabled on the StoreFront servers
Citrix Receiver client versions supported: 4.2 - 4.9
- Log-in as a Local Administrator to the workstation you would like to make changes on. The Client Configuration Tool will only run under an account with Local Administrator privileges.
- Navigate to the Windows® Start menu> All Programs > HealthCast > ExactAccess > Utilities > Configuration > Client Configuration.
- Click the Operation tab to show the type of configuration
- Select the "Passthrough authentication only" option.
- Select the item "Citrix Storefront connection" and click the "Configure..." button.
- Enter the information appropriate for your environment in the configuration settings page for StoreFront.
Published Name - This is the name of the resource to be launched. The same name that is displayed on the StoreFront web page.
Window Title - This is the text that appears in the title bar of the published resource. Typically the published name a space and a "-" is sufficient.
Storefront URL - This is the Receiver for Web Sites URL found in Citrix Studio > Citrix Storefront > Stores. The correct URL – when placed in a browser should resolve to the Citrix StoreFront login page.
Authentication Type – Determine what credentials to use when authenticating to StoreFront. Select XA User to use the XA Users credentials, select Windows User to use the Windows user credentials.
Application Type - If the published resource is a Shared desktop or VDI select the Shared desktop or VDI radio button if the published resource is an application i.e. Microsoft Notepad or Calculator, select the Published application radio button.If the Shared desktop or VDI radio button is selected the Set to Full Screen checkbox is enabled. If checked the Shared desktop or VDI will be displayed in full screen and the Citrix Tool bar is hidden limiting the user to the VDI or Shared Desktop.
Logging– If checked pubLauncherSF will log to %AppData%\HealthCast\logs\pubLauncherSF.log.
When enabled the application will log to the C:\Users<username>\AppData\Roaming\HealthCast\logs\sfConnect.log file.
TraceLevel – Set Trace level 1 – 4 for logging. The higher the trace level the more detailed logging.
1 – minimal
2 – low
3 – medium
4 – verbose
VMware Horizon View
VMware Horizon client versions supported: 4.0 - 4.6.1
- Log-in as a Local Administrator to the workstation you would like to make changes on.
- The Client Configuration Tool will only run under an account with Local Administrator privileges.
- Navigate to the Windows® Start menu> All Programs > HealthCast > ExactAccess > Utilities > Configuration > Client Configuration.
- Click the Operation tab to show the type of configuration
- Select the "Passthrough authentication only" option.
- Select the item "VMware Horizon View connection" and click the "Configure..." button.
- Enter the information appropriate for your environment in the configuration settings page for Horizon View.
Command line deployment
EXAMPLE
msiexec /i "HealthCast ExactAccess Client.msi" XA_MODE=KM XA_PROX_AUTH=myProxAuthServer XAD_ENABLED=1 X_PLUGIN=VIEW X_VW_DT=myDeskPool X_VW_URL=myViewURL X_KM_DOMAIN=HEALTHCAST X_PSE=0 X_PIN_LEN=5 X_RUN_CONFIG=0 /qn