Standard Mode Installation
The full XA Single Sign-On (SSO) client supports several configurable workflow options to meet varying organizational needs and dependencies for providing a secure and enhanced clinical workflow experience. It offers a full suite of SSO enabled applications from a local desktop. Standard mode allows for each user to have their own explicit session on the workstation.
Configuring for Limited Multiple Sessions
Limited Multiple Sessions is a workflow enhancement to the standard Windows operating system session handling abilities. It allows the administrator to choose the maximum number of active sessions a workstation may have to best make use of the limited available resources (such as RAM and CPU usage) by logging off the oldest sessions to make room for new sessions.
###
### Interactive Installation
-
Run the MSI
-
Adjust install directory if desired
-
Click Install
-
Confirm UAC if prompted
-
Client Configuration Tool will start when the install is complete
-
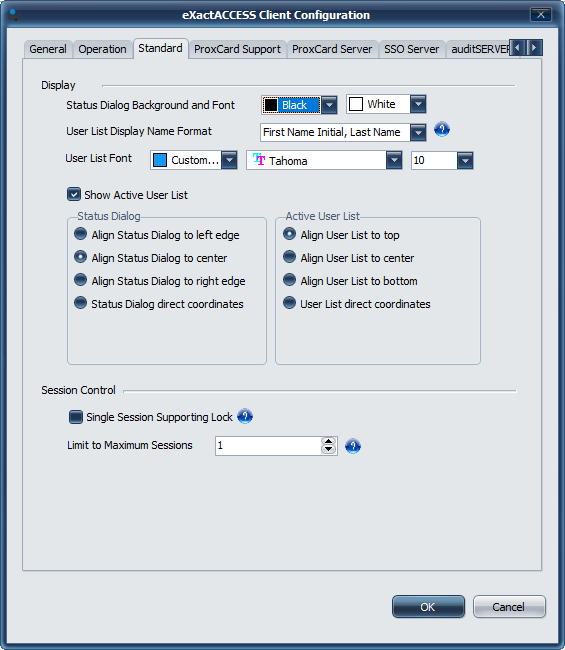
Choose Standard tab
-
Adjust the number in Limit to Maximum Sessions for an appropriate value for the resources available on the workstation.
-
Select ProxCard Support to adjust proximity card use settings.
-
Here, you can select to enable PIN prompting. Optionally, select the length of PIN required for enrollment on this workstation.
-
You can also select the option to require a prox card be tapped to initiate login. A user then must tap a badge in order to log into the workstation.
Requiring prox cards for login disables other methods of login for Windows sessions, meaning that the standard Windows login tiles are not select-able.
The Error Font, and Change PIN font settings on this page do not apply to standard mode. These settings apply to kiosk mode display only.
-
Ensure that all appropriate server connectivity information is provided under each of the server tabs.
-
After UI configuration is complete, select Finish and reboot the workstation when prompted.

-
Run the MSI
-
Adjust install directory if desired
-
Click Install
-
Confirm UAC if prompted
-
Client Configuration Tool will start when the install is complete
-
Choose Standard tab
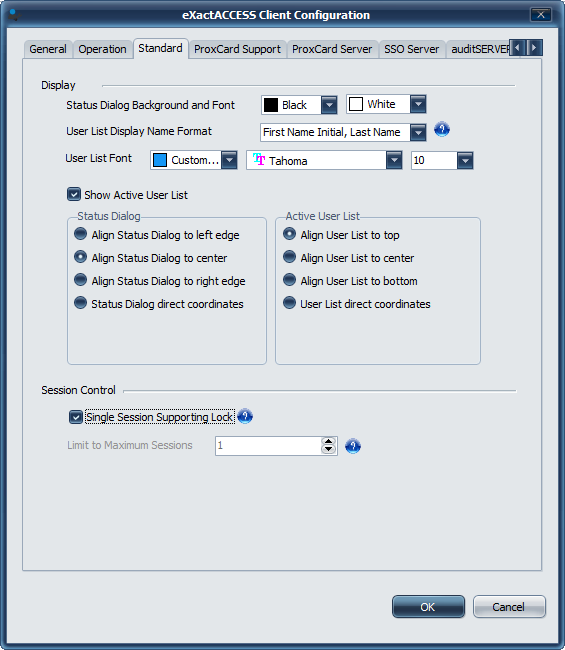
- Ensure the Single Session Supporting Lock is checked.
With this setting enabled, the system allows only one user to log in. Tap over or Login over are disabled.
An administrator may still log into the system as normal, even though an existing session may be present. The existing session will be logged out.
-
Select ProxCard Support to adjust proximity card use settings.
-
Here, you can select to enable PIN prompting. Optionally, select the length of PIN required for enrollment on this workstation.
-
You can also select the option to require a prox card be tapped to initiate login. A user then must tap a badge in order to log into the workstation.
Requiring prox cards for login disables other methods of login for Windows sessions, meaning that the standard Windows login tiles are not select-able.
The Error Font, and Change PIN font settings on this page do not apply to standard mode. These settings apply to kiosk mode display only.
- After UI configuration is complete, select Finish and reboot the workstation when prompted.
Per-Session Inactivity timeouts
It is now possible for each user session to have a customized lock and logoff timeouts independent of other users timeouts by modifying the following keys in the users/session profile registry:
HKEY_CURRENT_USER\Software\HealthCast\ExactAccess
LockTimeLimit: reg_dword = 60
LogoffTimeLimit: reg_dword = 240
Configuring SUM Workflow
Deploying Standard User Mode with Session Limits
From an administrative command prompt (or remote deployment package), execute the ExactAccess client install with the appropriate command line parameters.
-
Set kiosk mode: XA_MODE=SUM
-
Set the servers: XA_PROX_AUTH=(name of server)
-
Set to use auditSERVER: XA_AUDIT_SRV=(name of server)
-
Set to use Deploy server: X_D_SRV=(name of server)
- Set workstation deployment group: X_D_GRPS=(groups to add workstation to in HCIDeploy)
-
Set session limits: X_LS=(number of sessions)
-
Enable PIN Support:
-
Enable PIN Support: X_PSE=0 (by default, PIN support is DISABLED)
-
4294967295 = Pin support DISABLED
-
0 = Always prompt for PIN on every login (may also prompt for password if it is expired)
-
-
Set PIN Minimum Length: X_PIN_LEN=(4, 5, or 6)
-
-
Disable running configuration tool after install/upgrade: X_RUN_CONFIG=0
-
To enable Omnikey Proximity support: X_PROX_RT=SCARD
-
To use standard RFIDeas Proximity support: omit X_PROX_RT, or use: X_PROX_RT=USB
Command line deployment
Example
msiexec /i "HealthCast ExactAccess Client.msi" XA_MODE=SUM XA_PROX_AUTH=myServer XA_AUDIT_SRV=myServer X_D_SRV=myServer X_D_GRPS=Standard X_PSE=0 X_PIN_LEN=5 X_LS=1 X_RUN_CONFIG=0 /qn
Deploying Standard User Mode with Single User
From an administrative command prompt (or remote deployment package), execute the ExactAccess client install with the appropriate command line parameters.
- Set kiosk mode: XA_MODE=SUM
- Set the servers: XA_PROX_AUTH=(name of server)
- Set to use auditSERVER: XA_AUDIT_SRV=(name of server)
- Set to use Deploy server: X_D_SRV=(name of server)
- Set workstation deployment group: X_D_GRPS=(groups to add workstation to in HCIDeploy)
- Set single user on: X_DTO=1
- Enable PIN Support:
- Enable PIN Support: X_PSE=0 (by default, PIN support is DISABLED)
- 4294967295 = Pin support DISABLED
- 0 = Always prompt for PIN on every login (may also prompt for password if it is expired)
- Set PIN Minimum Length: X_PIN_LEN=(4, 5, or 6)
- Disable running configuration tool after install/upgrade: X_RUN_CONFIG=0
- Enable PIN Support: X_PSE=0 (by default, PIN support is DISABLED)
- To enable Omnikey Proximity support: X_PROX_RT=SCARD
- To use standard RFIDeas Proximity support: omit X_PROX_RT, or use: X_PROX_RT=USB
Command line deployment
Example
msiexec /i "HealthCast ExactAccess Client.msi" XA_MODE=SUM XA_PROX_AUTH=myServer XA_AUDIT_SRV=myServer X_D_SRV=myServer X_D_GRPS=Standard X_PSE=0 X_PIN_LEN=5 X_DTO=1 X_RUN_CONFIG=0 /qn