
Institutional enrollment can only be conducted by DEA-registered institutional practitioners and must be completed in-person.
This process will require that the user be added to the RapidIdentity MFA server. Once the user is enrolled, they can then proceed to enroll for the PingMe service. Proceed to Adding Users to the RapidIdentity MFA Server to continue with this type of enrollment.
Institutional Enrollment Overview
Reference the below steps to complete the Institutional Enrollment process.
- The user must be added to the RapidIdentity MFA server.
- Log out of the Admin Portal and have the user complete the user steps
- Enroll the User for PingMe Service.
- Enroll the User with Fingerprint Biometrics.
Adding Users to the RapidIdentity MFA Server
Follow the proceeding steps to enter the provider(s) into the MFA Server.
- Under the Administration Portal, select the Users tab.
- Select New Users from the left-side menu.
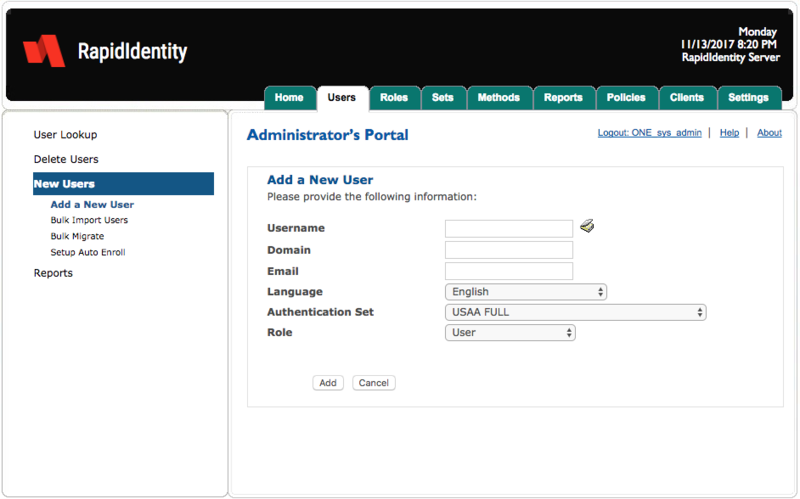
- Enter the following desired user information:
- Username
- Domain
- Language
- Phone Number
- Select the appropriate Authentication Set and Role.
- Select Add.
User Steps
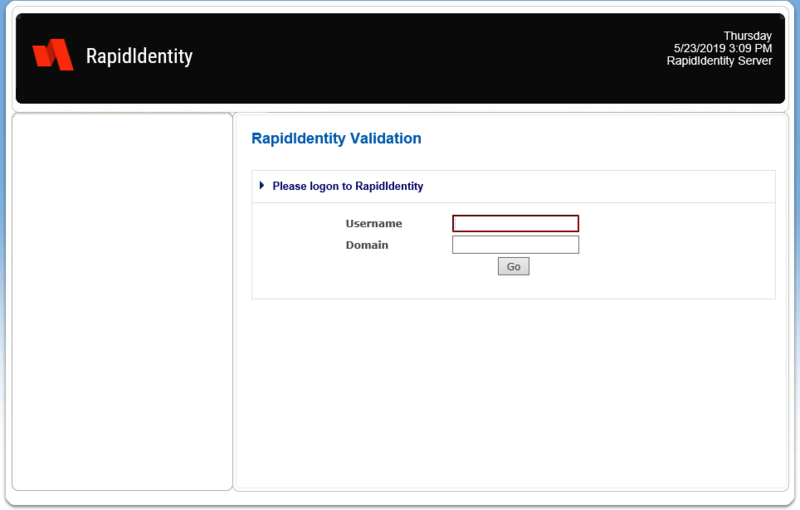
To complete setup, log out of the Admin Portal and have the user perform the following steps.
- Have the user enter the Username and domain.
- The user will be taken to the RapidIdentity User Portal.
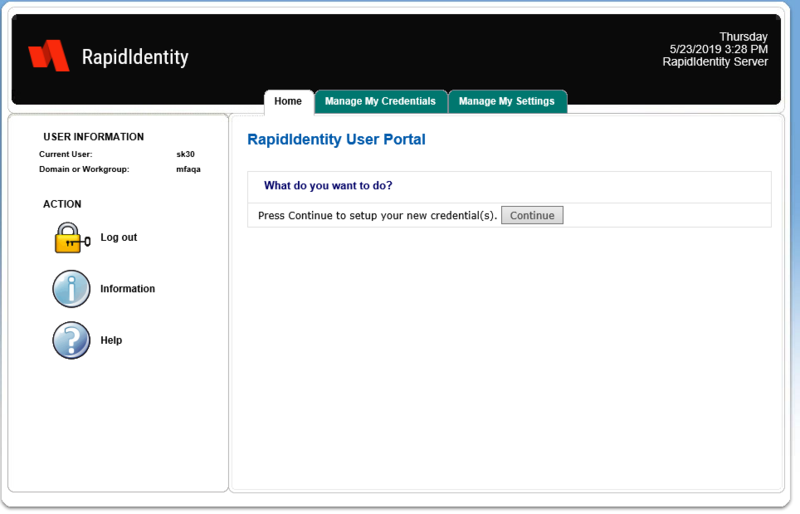
- Press Continue to set up new credential(s).
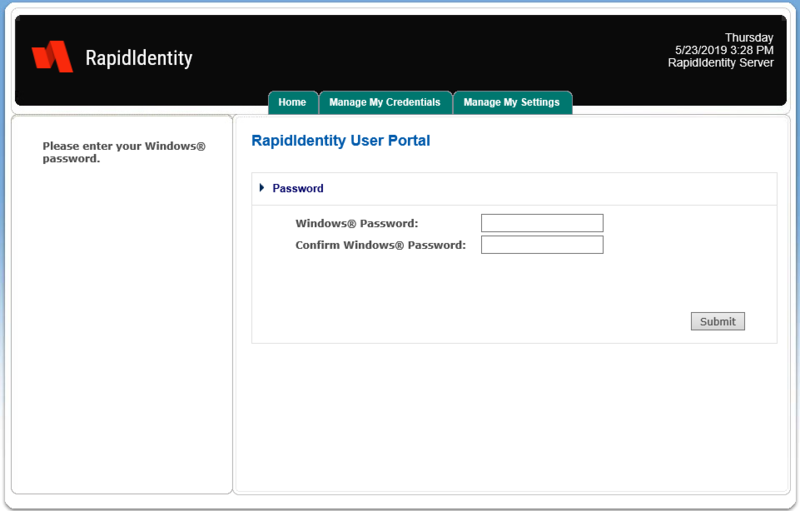
- The user will be prompted to set up and confirm a password.
- Note: This password will be linked to the fingerprints that will be captured in the following step.
- Note: This password will be linked to the fingerprints that will be captured in the following step.
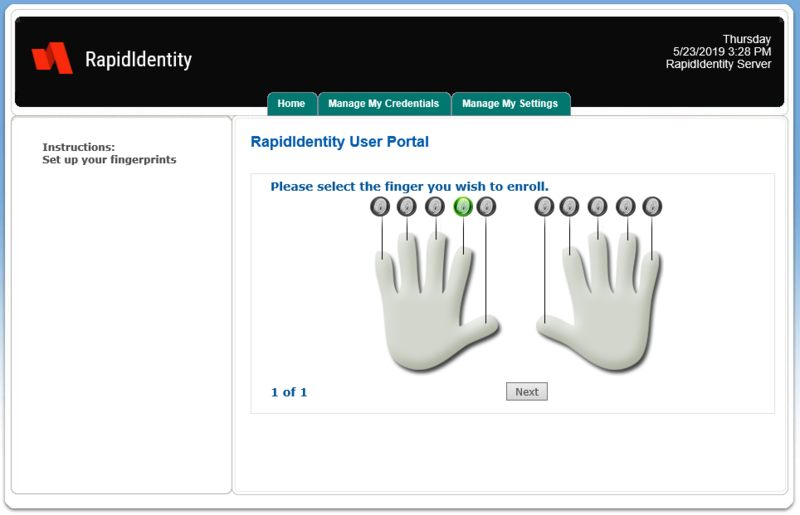
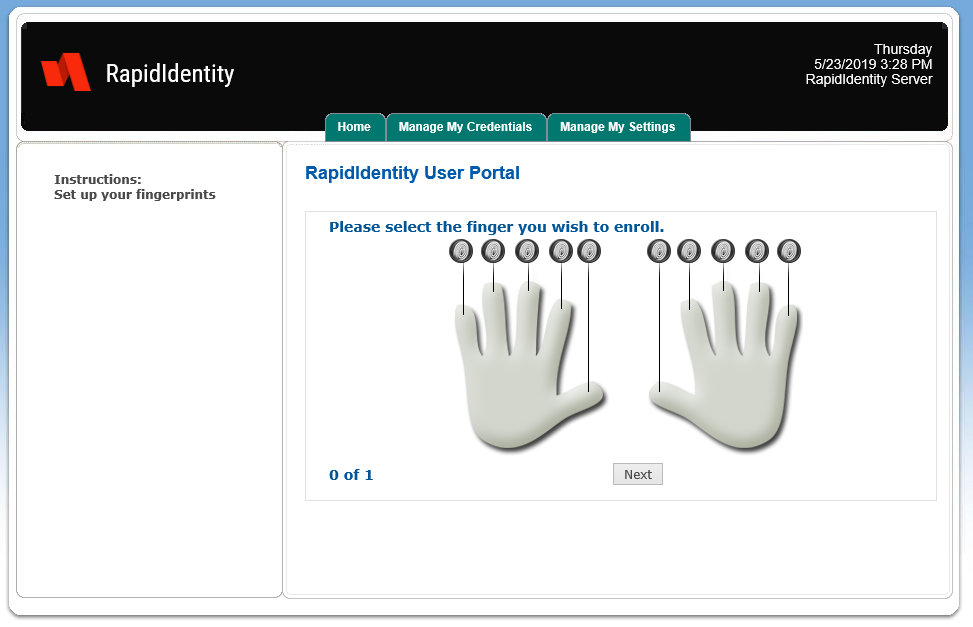
- The user will then select the finger they wish to enroll.
- Note: The person assisting in the enrollment process can guide the user through this process to ensure they select the fingers that are desired by the organization for authentication.

- Note: The person assisting in the enrollment process can guide the user through this process to ensure they select the fingers that are desired by the organization for authentication.
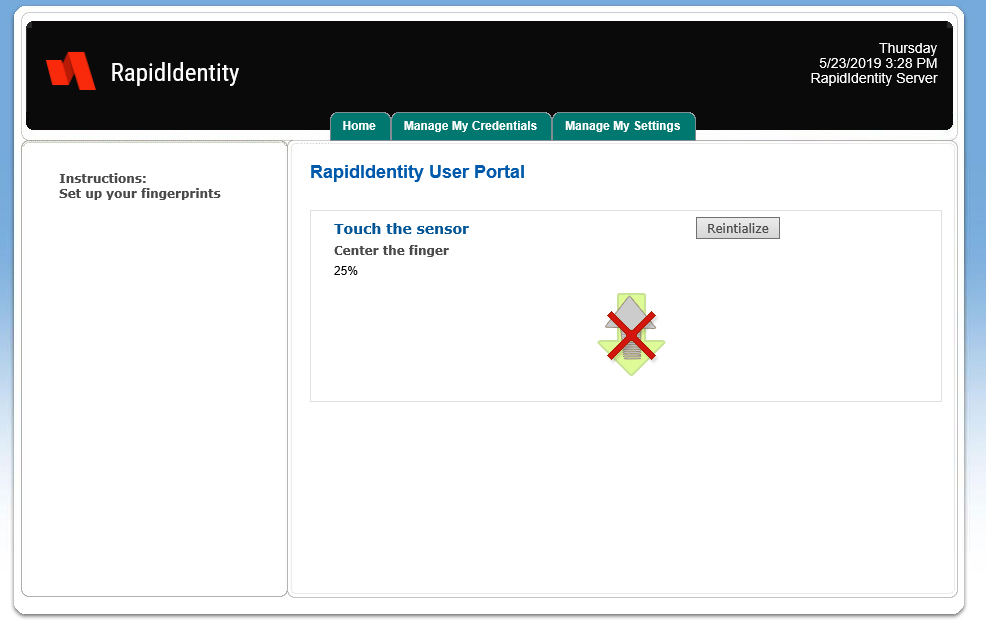
- Have the user place the matching finger onto the sensor to begin initializing the fingerprint registration.
- Important: Different scans are required in order to validate the fingerprint. The user will need to lift and place a finger on the sensor to obtain various scans.

- Important: Different scans are required in order to validate the fingerprint. The user will need to lift and place a finger on the sensor to obtain various scans.
- Repeat the steps above until the number of required fingerprints for registration is obtained.
- Note:
- Up to all ten fingerprints can be validated.
- Once fingerprints are validated, click Next.
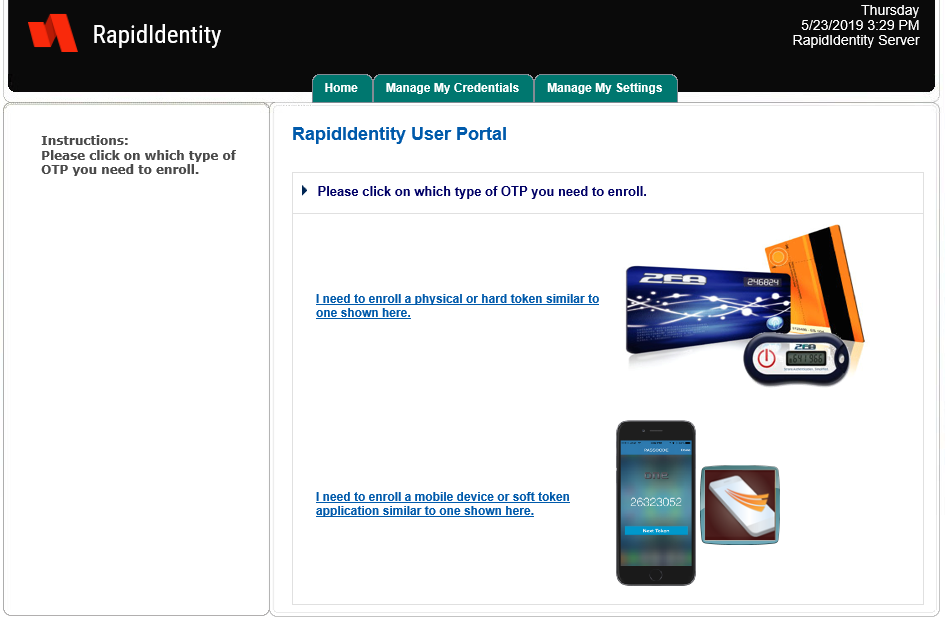
- The user will then be prompted to click on which type of OTP will be enrolled. Instruct the user to select the second option that involves enrolling a mobile device or soft token application.
- Note: Hard token is another option available to select.

- Note: Hard token is another option available to select.
- Enter your phone number and carrier and select Send SMS.
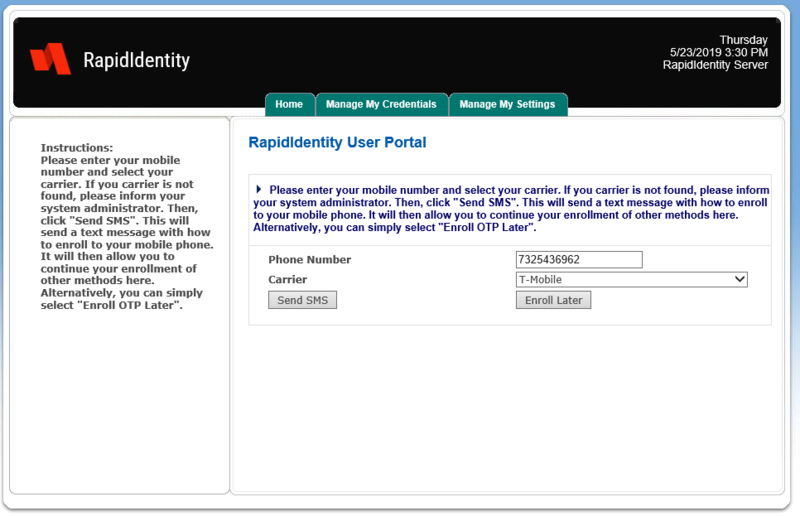
- The user will receive an on-screen notification that the process is complete. At this point, they will select Continue to proceed to the User’s Portal home page.
- The user will be prompted to finish enrollment on the mobile device
Once the user receives the SMS on their cell phone, they will enter the information provided on the SMS into the RapidIdentity mobile app and proceed to follow the on-screen prompts to complete their enrollment.
User Steps
To complete setup, log out of the Admin Portal and have the user perform the following steps.
- Have the user enter the Username and domain

- User will be taken to the RapidIdentity User Portal.
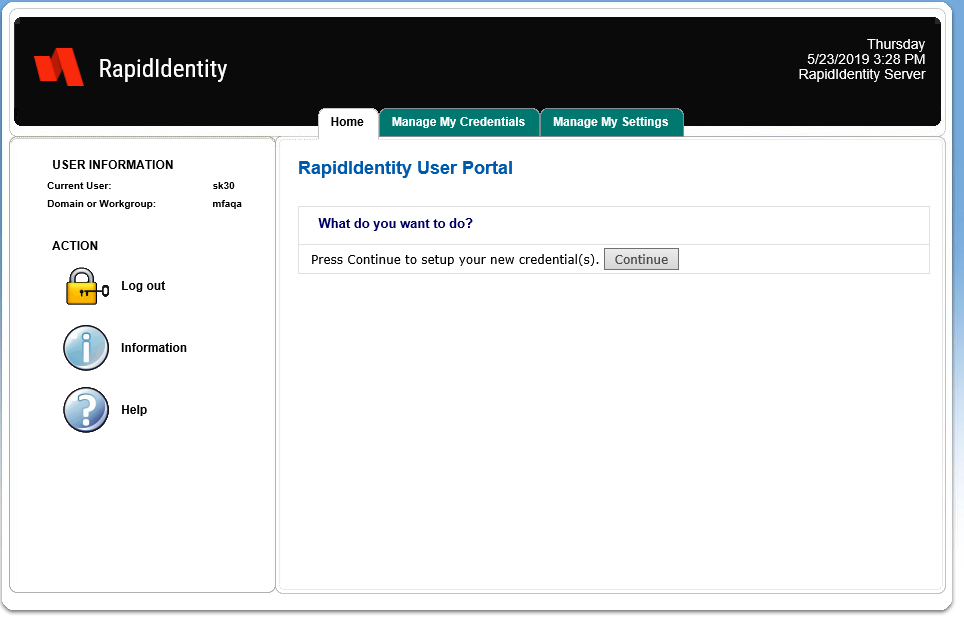
- Press Continue to setup new credential(s).
- The user will be prompted to set up and confirm a password
- NOTE: This password will be linked to the fingerprints that will be captured in the following step.

- User will then select the finger he/she wishes to enroll
- NOTE: The person assisting in the enrollment process can guide the user through this process to ensure they select the fingers that are desired by the organization for authentication.
- Have the user place the matching finger onto the sensor to begin initializing the fingerprint registration
- IMPORTANT: Different scans are required in order to validate the fingerprint. User will need to lift and place finger on sensor to obtain various scans.
- Repeat the steps above until the number of required fingerprints for registration are obtained

- NOTE: Up to all ten fingerprints can be validated.
- Once fingerprints are validated, click Next.
- The user will then be prompted to click on which type of OTP will be enrolled. Instruct user to select the second option that involves enrolling a mobile device or soft token application
- NOTE: Hard token is another option available to select.
- NOTE: Hard token is another option available to select.
- Enter phone number and carrier and select Send SMS.

- The user will receive an on-screen notification that the process in complete. At this point, he/she will select Continue to proceed to the User’s Portal home page.
- The user will be prompted to finish enrollment on the mobile device
- IMPORTANT: Once the user receives the SMS on their cell phone, they will enter the information provided on the SMS into the RapidIdentity mobile app and proceed to follow the on-screen prompts to complete their enrollment.