HealthCast EPCS Install on Citrix
Obtaining the API Key
In order to install HealthCast EPCS on Citrix, the API key first needs to be generated from the RapidIdentity MFA Server.
Follow these steps on obtaining the API Key needed to continue with the installation on Citrix.
- Log into the RapidIdentity MFA Server and click on the Clients tab.
- Select All Clients under the Lookup section on the left-hand side.
- Select the appropriate Workstation GUID that was initially set up in the enrollment.
- When the Client Details screen populates, click on the Edit button
- Check the box for Approved for API Calls.
- Click Save.
The API Key needed to continue with installing HealthCast EPCS on Citrix is the information in the Workstation ID field.
Installing HealthCast ExactAccess ('XA') Client on Citrix
Complete the HealthCast EPCS installation on Citrix by installing the HealthCast XA Client by following these steps.
These steps focus on setting up the XA Client to configure an audit server. Please visit the HealthCast XA documentation for details on Installation and configuration options.
- Open a command window as an administrator.
- Change the directory to where the "HealthCast ExactAccess Client x64.msi" file is located.
- Run the following command line: "HealthCast ExactAccess Client x64.msi"
- The InstallShield Wizard Welcome Screen will populate. Click Next.
- Click Next on the Installation Wizard screen.
- The HealthCast XA Client is ready to install. Click Install.
- The XA Client Configuration screen will populate when the installation is completed successfully. Make the following changes to this section.
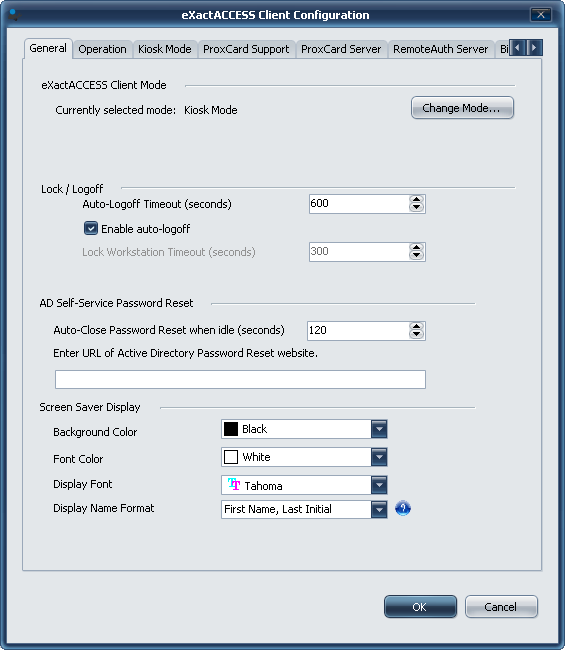
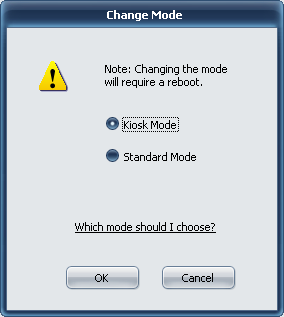
- On the General tab, click Change Mode and change it to Kiosk and click OK.
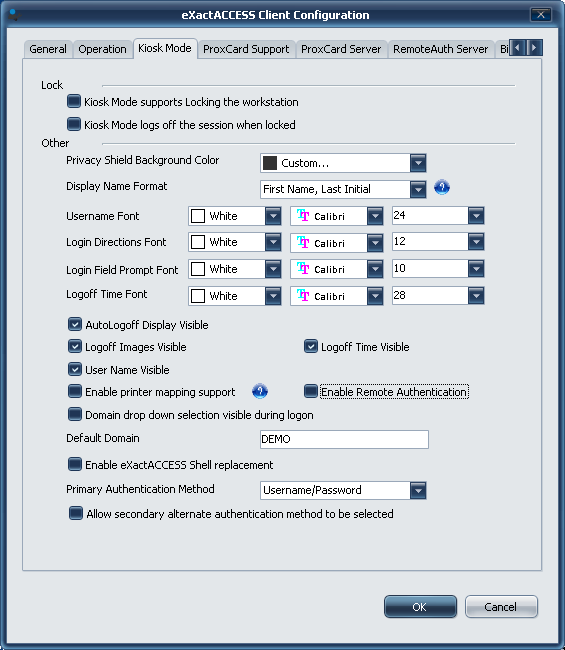
- This will populate the Kiosk Mode tab. Uncheck the boxes next to Enable Remote Authentication and Kiosk Mode supports locking the workstation.
- Scroll through the tabs to get to the auditSERVER tab.
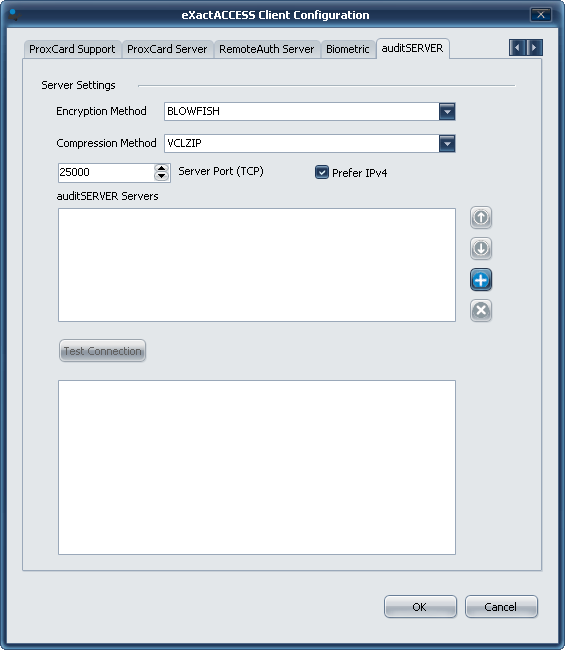
- Click the (+) button to enter the name of the auditSERVER servers being added. Click OK.
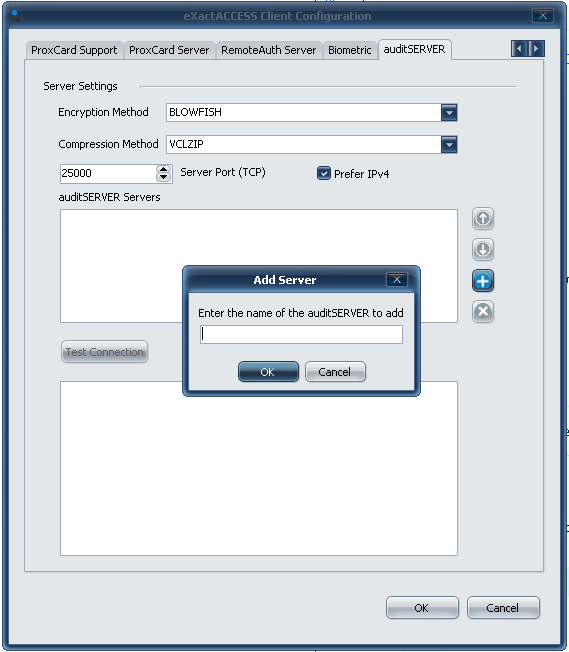
- Click on Test Connection to ensure it succeeds and click OK.
- On the General tab, click Change Mode and change it to Kiosk and click OK.
- Wait for the installation to complete successfully and press Finish once the Installation Completed screen populates.
- Click Yes to restart the system for the changes to take effect or click No to restart later.
Once the workstation is restarted, the HealthCast ExactAccess Client will be successfully installed on Citrix.
Installing RapidIdentity EPCS Plug-in for Epic on Citrix
The RapidIdentity EPCS Plug-in for Epic file needs to be installed on Citrix. Follow these steps to install the file.
- Open a command window as an administrator.
- Change the directory to where the "RapidIdentity EPCS plug-in for EPIC x64.msi" file is located.
- Run the following command line: "RapidIdentity EPCS plug-in for EPIC x64.msi" RI_APIKEY=40008a00-d066-4010-224c-01231d833006 RI_URL="https://auth01.demo.local/oneservice/ValidateService.asmx" RI_DD=demo
- Substitute your generated API key for RI_APIKEY
- Substitute your server URL for the machine running the MFA Authentication server for RI_URL
- Substitute your actual user authentication domain for RI_DD
The API key shown in this step serves as an example and is not the key that would be used in this installation. The API key is unique to each install.
- Enter the API key obtained.
- The InstallShield Wizard Welcome Screen will populate; click Next.

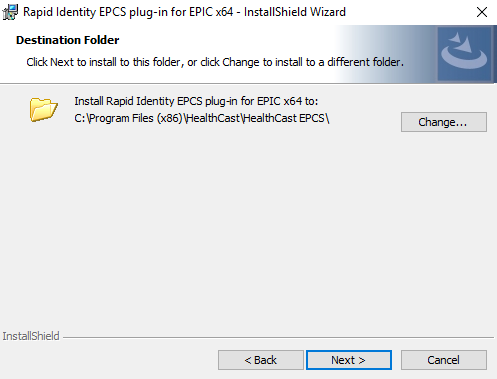
- The next screen that populates is the Destination Folder. Click Next to continue or select the folder in which the plug-in will be installed and then click Next.
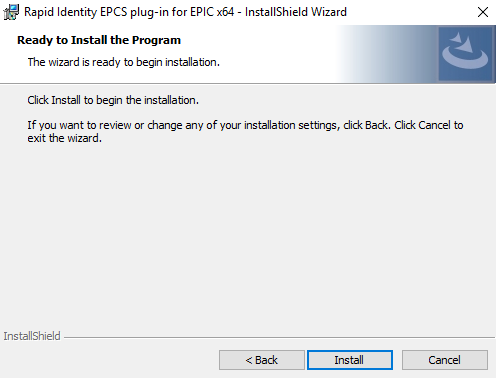
- Click Install to begin this process.
- The InstallShield Wizard Complete screen will appear when the installation is complete. Click Finish.
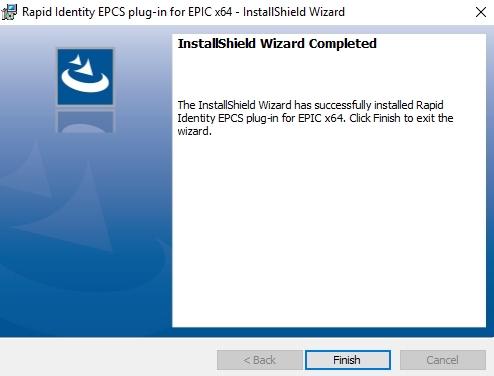
The RapidIdentity EPCS plug-in for Epic is now installed on Citrix.
Post Installation steps for using RapidIdentity EPCS Plug-in for Hyperdrive
In order to use the RapidIdentity EPCS Plug-in with Hyperdrive the following additional steps will need to be completed.
1. Generate the EPCS SAML keys
These steps are used to generate a SAML authorization token for the EPCS integration, which is required by Hyperdrive. This step can be done on a machine other than the Citrix machine. This step is not required for EPCS when integrating with the older Hyperspace (VB) versions.
- Install the Epic Authentication plugin v4.1.0 or greater. This installation is normally used for Identity Automation's primary authentication integration with Epic Hyperdrive, but also contains additional tools.
- Run IA.EpicAuth.Key.Generator.exe located in installation directory (default C:\Program Files (x86)\Identity Automation\EpicAuth)
- Click Create EPCS Key
- Change output path as desired.
- Input password and confirmation password information
- Click Create SAML Key
- Close out of the Key Generator screens.
- Store the resulting certificates in a safe place, and record the password carefully and securely.
This process will create two files, located in the output path. "IA Epic Hyperdrive SAML.cer" (the public key), and "IA Epic Hyperdrive SAML.pfx" (the private key).
2. Install the EPCS SAML Keys
- The private key will need to be imported on machines using the EPCS plugin. It should be imported into the Local Computer certificate store and should be imported into the Personal store. If you are using Citrix to run Hyperdrive, then each Citrix machine should have the private key imported. If you are running Hyperdrive on workstation endpoints directly (not through Citrix) then you will need to install the certificate on each workstation.
- The Epic 3rd party authentication device E0G records associated with EPCS will need to be changed to include the public key generated above. The ProgIDs for the affected records are RIBiometric.riBio and RIPingMe.RIToken. Your Epic TS will have additional information on how to set this up. Key points for E0G device records are noted here.
- Platforms should show "Full Client", and "Hyperspace Web"
- On the Desktop Settings screen:
- ProgID: RIPingMe.RIToken OR RIBiometric.riBio
- Hyperdrive ProgID can be left blank as the EPCS plugin supports both Hyperspace Classic Client (Full Client) and Hyperdrive (Hyperspace Web) and does not require a Hyperdrive specific ProgID
- On Web Device Settings screen:
- Token Type: SAML 2
- SAML Issuer:
- For RIPingMe use "IA Epic Hyperdrive SAML"
- For RIBiometric use "IA Epic Hyperdrive Biometric SAML"
- SAML Key File: [path on Unix server to the public key generated above]
- This certificate will need to be installed on all operational database servers and User Application servers (if ECP)
- The public certificate file needs to be reformatted with Unix style line endings
3. Using EPCS with EpicAuth ProxCard authentication
In order to use EPCS alongside EpicAuth ProxCard authentication, installation of EpicAuth v4.1.0 or above is required.