In this deployment step, you will add files from the QwickAccess for IGEL deployment package to IGEL UMS.
To begin, open the IGEL UMS Console app and log in. Then follow the steps below.
In UMS Console, right-click the Files item and select New file in the popup menu.
.png)
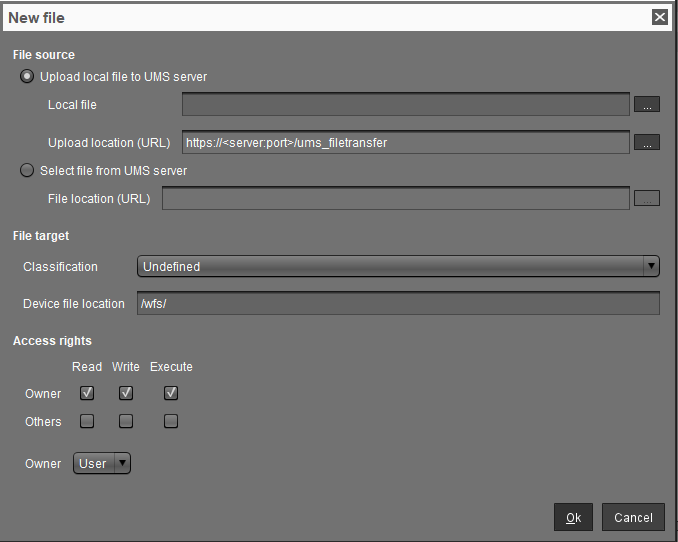
In the New file dialog, select the Upload local file to UMS server option, then click the … button to browse.

In the Open dialog, browse to the qax-igel-1.3.0.inf file (found in the QwickAccess for IGEL deployment package), select it and click Open.
Leave all the other settings in the New file dialog as they are and click Ok.
Next perform steps 1 through 4 again, but this time select the qax-igel-1.3.0.tar.bz2 file.
At this point you should see both the qax-igel-1.3.0.inf and qax-igel-1.3.0.tar.bz2 files under the Files node of the UMS Console app. You can organize these two files any way you wish under the Files node. For example, you could place them in the sub-folder Files > QwickAccess for IGEL > Version 1.3.0.
Now, import the QwickAccess for IGEL profile by clicking System in the IGEL UMS Console app and then clicking Import… > Import Profiles.
In the Open dialog, browse to the qax-igel-1.3.0-profile.xml file (found in the QwickAccess for IGEL deployment package), select it and click Open.
Verify that the QwickAccess for IGEL - Version 1.3.0 profile is found under the Profiles node of the UMS Console app.
You are now ready to move to the next deployment step, Step 5: Configure Settings.